One of the most important yet underrated accessories that is attached to your laptop is a webcam. Now we have used the term underrated because most of us feel that the only place where a webcam can be used is on Skype. But wait, as your webcam can also be used as one of the most important tools to capture an image.
So, whether you have a dedicated camera or using an external webcam that is plugged in via USB you can use both to take a picture on the laptop. And what more if you are using Windows 10 then it has an inbuilt Camera app that can ease the process of taking photos in a laptop.
But in case you do not have any idea on how to take a picture with a webcam on Windows 10 and this article is going to help you. So without further ado let’s start.
How to Take Photos on a Laptop
As discussed above if you are using a laptop with Windows 10 installed on it then you have a dedicated inbuilt camera app to take a picture with a webcam.
So here are the steps on how to take a picture on a laptop.
- First thing first. So before we get started first of all make sure that your laptop has a webcam. So, if your laptop has a built in webcam as most of the laptops then you are good to go. But in case your laptop doesn’t have a webcam then you need to install one before getting started.
- Now click on the Windows Start button located on the bottom left corner of your screen.
- On the Windows search type camera. This will search your laptop for the Camera app, to take a picture with an attached camera.
- From the results that populate, click on the Camera app icon. This will open the Windows Camera app on your laptop.
Note: If it is the first time you are using the Camera app, then a prompt will display on the screen, saying, “Let Windows camera access your location”. Select Yes to continue. - Next, wait for a second or two before your laptop’s camera turns on. A light next to your camera will blink once the camera is ready, and you will start seeing yourself in the Camera app’s window.
- For a beautiful picture as recommended just bring a slight smile on your face and click on the Capture button, which is a camera-shaped icon on the Camera app window. You will hear a slight sound of shutter click and your photo is automatically saved in a folder called Camera Roll that itself resides in the Pictures folder.
Many modern laptops have two cameras, one that points you and another that points in the opposite direction. Select Change Camera option to switch between front and rear camera.
You can also play with the various settings of the Camera app, like the framing grid or photo quality. To do so click the Settings button located in the upper-right corner of the window.
A panel will appear with two options: Self Timer and Settings.
The Self Timer is also an interesting feature that helps you to set a timer for taking photos.
Click on the Self Timer to open the Self Timer panel. Now choose a Delay option from the available options of 2, 5, or 10 seconds, and then select the check mark at the bottom of the window. Once done you will return to the Camera screen.
Now to test the feature, select the Camera button to take another photo. A countdown timer will appear, and provide you a few seconds to set up yourself. If you aren’t impressed by the Timer feature you can turn it off by returning to the Self Timer panel and selecting the X button.
How to Take Photos on a Laptop with Windows 8 Installed
If you have a laptop with Windows 8 installed then also you can easily take a photo in your laptop using Windows native Camera app.
To get started, press the Windows key on your keyboard and in the Windows Search type Camera. From the search results, click on the Camera app to launch it and then start using it to capture a picture or record videos. Using the Camera app in Windows 8 is similar to using it on Windows 10. The images captured will be saved to the folder called Camera Roll that itself resides in the Pictures folder.
How to Take a Picture on a Laptop with Windows 7 Installed
If you are still using Windows 7 then we would like to bring to your attention that this version of Windows operating system does not have a built-in way or an inbuilt app like Camera app that you find in Windows 10. However, it doesn’t mean that you cannot take a photo with a webcam on your laptop. But to do so you need to use a third party software using which you can take photos on your laptop.
So here are some best webcam software for Windows 10 as well as other versions of Windows operating system.
AMcap
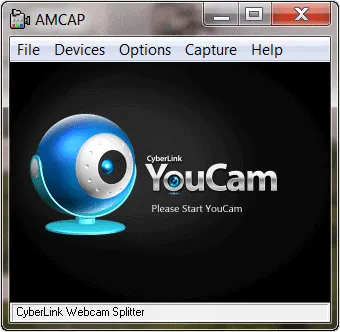
If you are looking for the best webcam software for Windows 10 for taking pictures or recording videos then AMcap will not disappoint you. The program is light on your system resources and it can access your webcam using DirectX functions.
Using AMcap is so simple that as soon as you install it on your computer a small window will load that will detect your webcam automatically. And once AMcap activates your webcam, you can take photos using this software by going to “Capture” and selecting “Take picture” option.
Yawcam
Yawcam, abbreviated as Yet Another Webcam software, is a free to use webcam software that can help you to take photos as well as do video streaming.
Once you install this software, you will see two dialog windows – one that displays your webcam, the other containing menu controls.
For Yawcam to detect your webcam, click the “Settings” and select “Detect webcam.
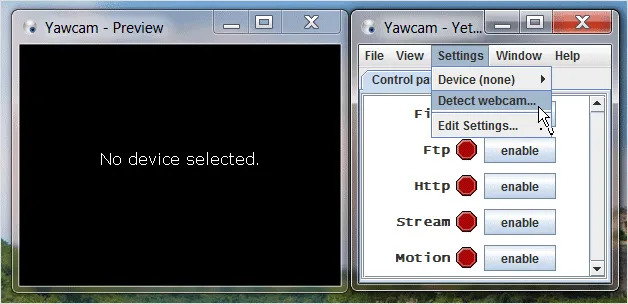
And to take pictures with Yawcam, navigate to “Window” and from the drop down menu select the “Capture” option.
Apart from these third party webcam programs there are some online services that don’t require you to download any program on your computer.
Webcam Snapshot and Take Pictures Online are some of the well known websites for taking a picture with a webcam on your laptop.
Conclusion:
So readers this is all from our side. We hope that you now have a clear understanding on how to take photos on a laptop. Happy clicking guys.